A Custom Import Filter
This example implements a complete import filter for a binary file format. The resulting import filter supports virtually all options available for realizing custom import filters via Automation. It was specifically designed to be able to serve as the framework for your own import filters.
To keep the example simple, it does not include error handling.
The Format to be Imported
The format to be imported is a binary format that was generated for illustrative purposes but features a common pattern. A program that can produce files in the sample format, and that was used to create the Demofile.tst sample file, is located as C++ source code in the same subfolder as the sample ImportFilter.fpd database and sample file. The path to the project database is usually C:\Users\Public\Documents\Weisang\FlexPro\2021\Examples\VBA\ImportFilter\ImportFilter.fpd or C:\Users\Public\Public Documents\Weisang\FlexPro\2021\Examples\VBA\ImportFilter\ImportFilter.fpd.
You can implement a custom FPScript function in FPScript as well. See Custom FPScript Functions Tutorial.
The binary files consist of three parts:
•A file information structure that includes the number of channels and the sampling rate. Here is how it is defined in Visual Basic:
Private Type FileHeader
strID As String * 8
nVersion As Integer
strOrigin As String * 32
nNumberOfChannels As Long
nNumberOfSamples As Long
fSamplingRate As Double
nTrigger As Long
End Type
•A number of channel header structures corresponding to the number of channels that describe the included channels:
Private Type ChannelHeader
strName As String * 8
strDescription As String * 64
strUnit As String * 8
End Type
•The third part contains the data, starting with the data of the first channel, followed by those of the second, etc.
Import Filter
To realize an import filter, a class module has to be created in a database; the module implements the IImportFilter interface (in the example: class module DemoImportFilter). By entering
Implements IImportFilter
in the code window of the class module, the entry IImportFilter becomes available in the object window. If this entry is selected, the two procedures of the interface IImportFilter are listed in the Procedure window. Once the two interface procedures have been selected in the Procedure window, the corresponding procedure roots are added to the Code window, including the correct arguments.
ImportSpy Procedure
Once a user has started an import procedure by calling the Import dialog box and selecting a file, the ImportSpy procedure of all import filters registered with FlexPro is initiated in order to find out which import filters can import the file.
In the example, IImportFilter_ImportSpy first checks which filter was specified. This step only takes place for the sake of thoroughness. In this case it is not imperative because only one format has been registered for the import filter.
...
If Filter = m_strFilter Then
...
The filter verifies whether the name extension of the file corresponds to the one used for registering the filter:
...
If Right(UCase(PathName), 4) = ".TST" Then
...
The file is not opened and the file header is not read until the verification yields a positive result:
...
Open PathName For Binary Access Read As #1 Len = Len(TheFileHeader)
Get #1, , TheFileHeader
Close #1
TheFileHeader.strID = CutString(TheFileHeader.strID)
If TheFileHeader.strID = "DEMO " And TheFileHeader.nVersion = 1 Then
IImportFilter_ImportSpy = True
End If
...
The example file format contains an identifying text and a version number that help to identify the format. If the identifying text is correct and the file format features a version that is supported, the function will return True.
If additional specific import filters that support this file format exist, a selection dialog box appears during import in which the user can select the import filter to be used. FlexPro then calls the Import procedure of the import filter in order to import the file.
Import Procedure
The Import procedure is only called if the ImportSpy procedure of the import filter has been called successfully.
As with the ImportSpy procedure, the first step is a verification of the filter. Then, the file header of the specified file as well as the header information for all elements or channels are read:
...
Open PathName For Binary Access Read As #1
Get #1, , TheFileHeader
For i = 1 To TheFileHeader.nNumberOfChannels
Get #1, , TheChannelHeader
Set oImportItem = New ImportItem
oImportItem.strName = CutString(TheChannelHeader.strName)
oImportItem.strDescription = _
CutString(TheChannelHeader.strDescription)
oImportItem.strUnit = CutString(TheChannelHeader.strUnit)
oImportItem.nSamples = TheFileHeader.nNumberOfSamples
oItemColl.Add oImportItem
Next i
nDataStartPos = Seek(1) - 1
Close #1
...
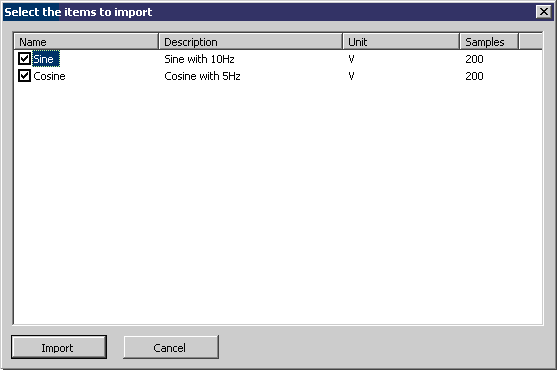
The elements found are stored in a Collection object together with all the data relevant for presentation in the dialog box or for import. If the file is automatically imported in its entirety, a dialog box appears where the user can choose the elements to be imported.
...
If (Flags And fpImportOptionAutomatic) = 0 Then
Set oFrm = New ImportItemsSelectFrm
oFrm.InitAndShow oItemColl, Flags
bCancel = oFrm.m_bCancel
Unload oFrm
End If
...
Eventually, the selected elements are then imported, taking into account the Flags parameter. If a new subfolder is to be created for each file to be imported, these subfolders are created first:
...
If Flags And fpImportOptionSubfolder Then
Set oFile = oFS.GetFile(PathName)
Set oImportFolder = Folder.Add(Left(oFile.Name, InStrRev(oFile.Name, ".")_
- 1), fpObjectTypeFolder)
Else ' import into the given folder
Set oImportFolder = Folder
End If
...
If the data are not to be imported as signals, an X data set is created first; it can be referenced by all further data sets as an X component. In the example, there is only one sampling interval and one trigger, so that the X component can be calculated using a formula:
...
If (Flags And fpImportOptionSignal) = 0 Then
Set oXItem = oImportFolder.Add("XItem", fpObjectTypeFormula)
oXItem.Origin = TheFileHeader.strOrigin
oXItem.Component = fpDataComponentX
oXItem.Formula = "(" & CStr(TheFileHeader.nNumberOfSamples) & ", " & _
CStr(-(TheFileHeader.nTrigger * oBinaryDataLink.SamplingInterval)) _
& ", " & CStr(1 / TheFileHeader.fSamplingRate) & ")"
End If
...
Lastly, all selected Y components in the file are imported. In the example, this can be done by taking advantage of the capabilities FlexPro binary import offers. For every channel to be imported, a BinaryDataLink object is created and parameterized according to the specifications. Lastly, the procedure decides whether the object created is evaluated into a data set (the flag fpImportOptionLink was set) or whether the BinaryDataLink object is preserved as a link.
...
For i = 1 To oItemColl.Count
If oItemColl(i).bSelected = True Then
Set oBinaryDataLink = oImportFolder.Add(oItemColl(i).strName_
, fpObjectTypeBinaryDataLink)
' general properties
oBinaryDataLink.CommentsY = oItemColl(i).strDescription
oBinaryDataLink.Origin = TheFileHeader.strOrigin
oBinaryDataLink.Author = Application.UserName
' import properties
oBinaryDataLink.FilePath = PathName
oBinaryDataLink.NumberOfBlocks = 1
oBinaryDataLink.BlockSize = 200
oBinaryDataLink.ByteDistance = 0
oBinaryDataLink.ResultDataType = fpBinaryDataLinkResultDataTypeFloatingPoint64
oBinaryDataLink.DataType = fpBinaryDataLinkDataTypeFloatingPoint64
oBinaryDataLink.ByteOffset = nDataStartPos + ((i - 1)_
* TheFileHeader.nNumberOfSamples * 8)
' as signal ?
If Flags And fpImportOptionSignal Then
oBinaryDataLink.AsSignal = True
oBinaryDataLink.SamplingInterval = 1 / TheFileHeader.fSamplingRate
oBinaryDataLink.SamplingOrigin = -(TheFileHeader.nTrigger_
* oBinaryDataLink.SamplingInterval)
Else ' assign the X component created above to this item
oBinaryDataLink.Component = fpDataComponentY
oBinaryDataLink.AssignedX = oXItem.Name
End If
' if import action is copy than evaluate the binary data link
If (Flags And fpImportOptionLink) = 0 Then
oBinaryDataLink.Evaluate
End If
End If
Next i
...
If the import has been completed successfully, the procedure will return True.
Registering an Import Filter
For a customized import filter to be available in FlexPro's Import dialog box (the file format is listed under File Type, it has to be generated using
Dim oImportFilter As New DemoImportFilter
and then be registered with the FlexPro Application object by calling RegisterImport.
RegisterImport oImportFilter.m_strFilter, _
fpImportOptionSpecific Or _
fpImportOptionLink Or fpImportOptionNoLink Or _
fpImportOptionSubfolder Or fpImportOptionNoSubfolder Or _
fpImportOptionAutomatic Or fpImportOptionManual Or _
fpImportOptionSignal Or fpImportOptionNoSignal Or _
fpImportOptionNoCalendarTime, _
oImportFilter
During registration, the import filter itself is referenced and specifies which of the options available in the Import filter dialog box are supported.
If, for example, an import filter does not support links, only the fpImportOptionNoLink flag is specified in the first argument of RegisterImport. The Create links option will be grayed out and will not be set if this import filter is selected in the Import dialog box. If only fpImportOptionLink is specified, the option Create links is also gray, but activated. If both options are supported (fpImportOptionLink or fpImportOptionNoLink), the user can freely choose how the import will take place.
This procedure also applies to the following options:
•Create new folder for each file
•Import with absolute time
•Import as signals
If an import filter is to be available in all databases of one user or to all users in general, it is recommended that you implement it in the personal template database and to register it in the procedure AutoExec, which is executed automatically when the template database is loaded. De-registration can then be handled by the AutoExit procedure (see also Auto Macros).
Note: When developing a customized import filter, please consider the following: When a VBA project is reset, such as due to code changes in the debugger, previously registered import filters of this project will no longer be called. The import filter has to be de-registered and re-registered again.