Video Analysis Tutorial
This tutorial shows you how to use FlexPro to analyze videos that you recorded in conjunction with measurement data.
Note: FlexPro Professional or FlexPro Developer Suite is required for video analysis.
Importing Videos and Measurement Data
1.Click on the Data tab of the ribbon and set the options in the Import Settings group as shown in the picture [1].
2.Now click on Data[Import from Files and Databases] > Binary Data to open the Import dialog box [2].
3.Switch to the folder C:\Users\Public\Documents\Weisang\FlexPro\2021 or C:>Users>Public>Public Documents>Weisang>FlexPro>2021. From there, switch to the subfolder Video Analysis and select the two video files called Side View.avi and Front View.avi as well as the measurement data file called Acceleration.fpf.
4.Click Open.
FlexPro imports the two videos as media and the measurement data as a data set.
Video Time Base Settings
To ensure that FlexPro correctly synchronizes videos with the measurement data, the video time base must be set correctly. Only the playback speed, such as 20 frames per second (often using the unit fps for "frames per second"), is stored in the video files. For high-speed recording, however, this deviates from the recording rate, which may be 500 fps, for instance. In addition, it is necessary to know the time at which the first frame in the video was recorded. The times for all frames in the video can be determined from this starting time and the recording rate.
Note: The X component of the measurement data must have a time unit. FlexPro does not synchronize the cursors if the unit is different or there is no unit.
The required information is displayed in the frames in the video examples:
1.Double-click on the Side View media in the Object List to open it.
2.Now click on Media Tools/Design[Cursors] > On/Off to activate the cursors.
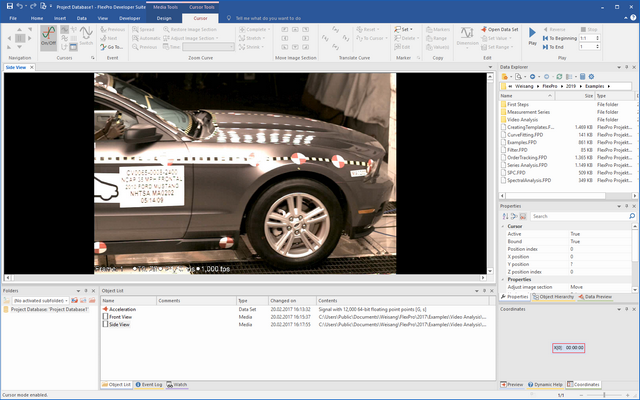
The video was recorded at a frame rate of 1000 fps and the first frame has been assigned the time of -24.40 ms. You can now use this information to set the time base for the media file:
3.Select the Side View media in the Object List.
4.Scroll down the Properties window on the right edge of the screen until you see the Time base field. Select Starting time and frame rate.
5.In the Starting time field, enter -24.40 ms.
6.Next, in the Frame rate field enter the value 1000.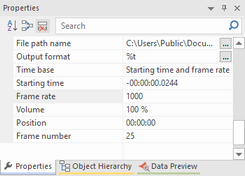
Now you can check if you set the time base correctly:
7.Move the horizontal scrollbar slider all the way to the right to navigate to the last frame of the video.
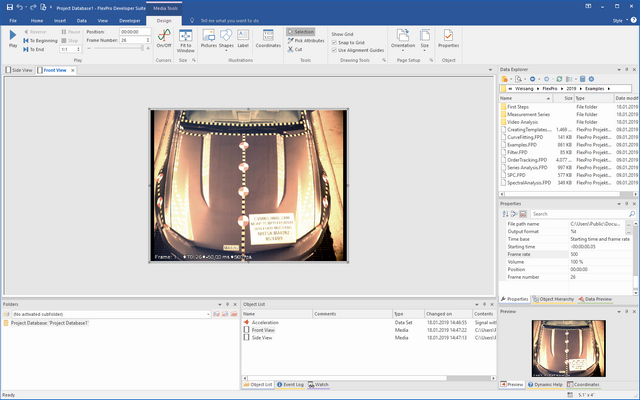
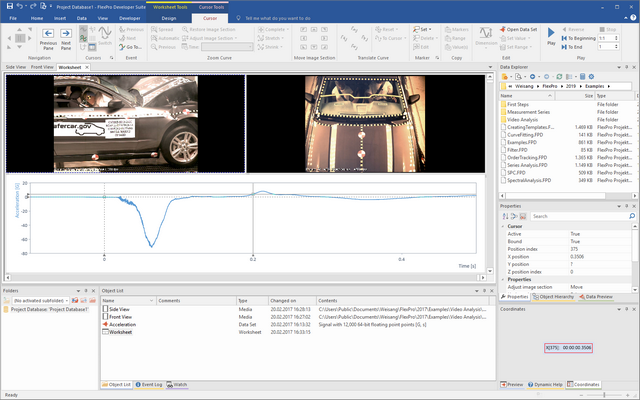
The frame appears in the video with the number 376 and is assigned a time of 350.60 ms [1]. In the FlexPro Coordinates Window you see x[375]: 00:00:00,3506 [2]: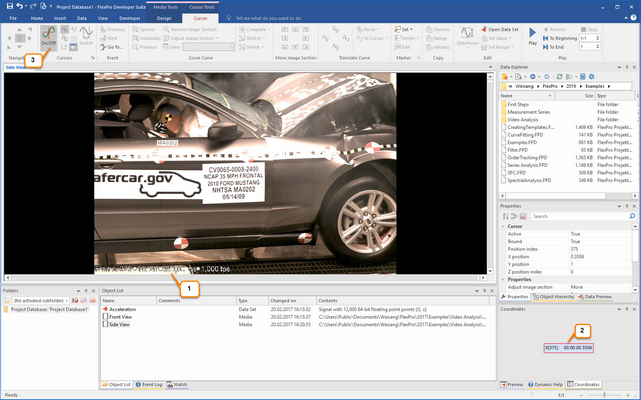
The time therefore matches. Only the frame number of 375 is one number lower. This is because FlexPro works with zero-based indices when cursoring, i.e. like the first data point in a curve, the index of the first frame in the video is 0.
8.Now use the command [Cursors] On/Off to disable the cursors [3].
Note: When you disable the cursors, the current frame is used as the still image. This still image is displayed when cursors are deactivated or when you display the media file in a document. You can set the image number that you want for display as the still image in the field under Media Tools/Design[Play] > Frame Number. Note that the still image (frame) numbers are counted starting with one.
The second video called Front View was recorded at a rate of 500 fps, and the first frame is assigned the time -50 ms. You can now repeat the steps above for practice or select the media file called Front View in the Object List and then in the Properties window you can change the Time Base to Starting time and frame rate and the two values in the Frame rate and Starting time fields.
Synchronized Analysis of Videos and Measurement Data
The two videos can now be displayed and analyzed together with the acceleration signal in a worksheet :
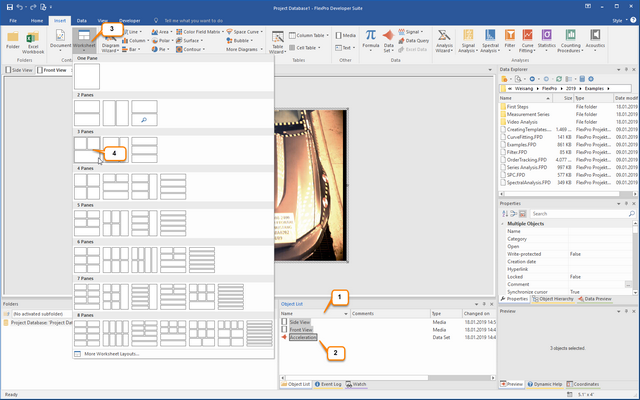
1.In the Object List reverse sorting of the Name column [1] and select the objects Side View, Front View and Acceleration [2].
2.Click Insert[Containers] > Worksheet [3] and choose the first entry with three areas [4].
Playing a Video
1.Click on the upper left field in the worksheet to select the Side View video.
2.Click Cursor Tools/Cursors[Play] > To Beginning to jump back to the beginning of the video.
3.Now click on Cursor Tools/Cursors[Play] > Play to play the video.
4.You can stop playback using Cursor Tools/Cursors[Play] > Stop.
Note: While playing the video, FlexPro tracks the cursor in the signal. You can set the cursor tracking increment in seconds by clicking on the diagram and then changing the Playback increment value in the Properties window.
Displaying the Still Image for a Measurement Signal Event
1.Click on the diagram to select it.
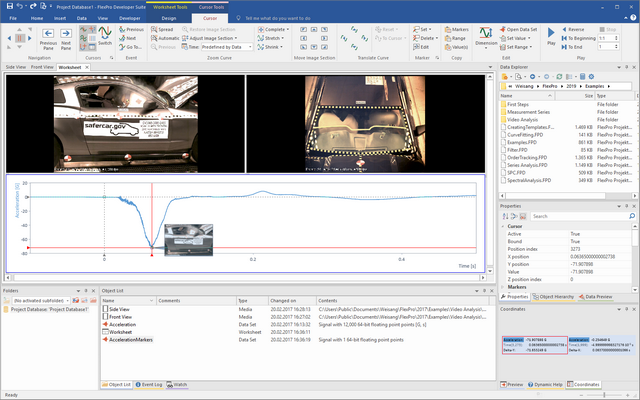
2.Now click on an event in the signal, such as on the point with the maximum delay, to position the cursor. FlexPro synchronizes the videos and displays the corresponding still images.
Navigating to a Still Image with a Particular Number
1.Click on the video in which you want to navigate to a particular still image.
2.Enter the zero-based Position index in the Properties window. If you enter 0, for instance, it will navigate to the first frame in the video.
Note: You can view a video frame by frame by clicking on the arrow keys or using the horizontal scrollbar.
Assigning an Image Marker to Events in a Signal
1.Right-click with your mouse on the diagram and select Properties.
2.Click on the Markers (Active Diagram) tab.
3.In the Image marker area select Media as the Source.
4.In the Media field select Side View. This video will now act as the source from which FlexPro will take the still images for the image markers.
5.Close the dialog box by clicking OK.
6.Now position the cursor on the point with the maximum deceleration, hold down the ALT key and press ENTER on the keyboard. FlexPro sets an image marker at the specified location.
7.Position the image marker by dragging it with the mouse to the desired location.
See Also
You might be interested in these articles
You are currently viewing a placeholder content from Facebook. To access the actual content, click the button below. Please note that doing so will share data with third-party providers.
More InformationYou need to load content from reCAPTCHA to submit the form. Please note that doing so will share data with third-party providers.
More InformationYou are currently viewing a placeholder content from Instagram. To access the actual content, click the button below. Please note that doing so will share data with third-party providers.
More InformationYou are currently viewing a placeholder content from X. To access the actual content, click the button below. Please note that doing so will share data with third-party providers.
More Information

